
Ein Update der Exchange Organisation von Exchange 2013 zu Exchange 2016.
Als erstes einmal die Spielregeln vorweg:
- Der Exchange Server 2013 muss mindestens CU8 sein (Ein Exchange Server 2010 müsste mindestens SP3 RU9 haben) sollte aber generell immer auf aktuellem Patchlevel sein!
- Die Domänencontroller müssen mindestens Windows Server 2008 sein
- Die Domänen-Gesamtstrukturfunktionsebene muss mindestens 2008 sein.
- Das Betriebssystem für den Exchange Server 2016 muss mindestens 2012 sein sowie die Server GUI aktiviert haben (Die Verwaltungstools laufen auch ab Windows 8.1 x64)
- Windows Management Framework 4.0 (PowerShell 4.0) (Download für Windows Server 2012)
- Mindestens .NET Framework 4.8
- Das Visual C++ Redistributable Package für Visual Studio 2012
- Das Visual C++ Redistributable Package für Visual Studio 2013
- Outlook 2010 mit KB2965295 und neuer werden als Client unterstützt (Outlook 2007 lässt sich nicht mit einem Postfach auf Exchange 2016 verbinden!)
Als Vorbereitungsmaßnahme empfiehlt es sich am alten Exchange 2013, sofern noch nicht aktiviert, Mapi over HTTP zu aktivieren -> KLICK
Vorbereiten des Exchange 2016 und Download der Komponenten:
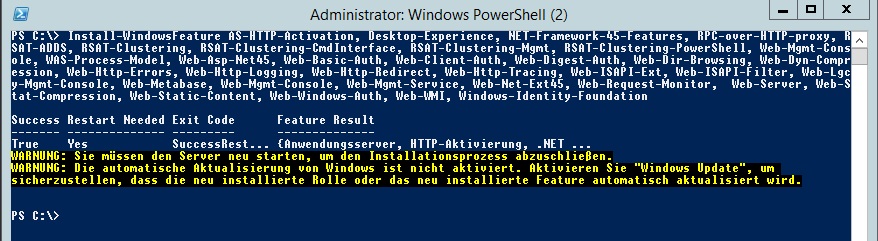
Install-WindowsFeature AS-HTTP-Activation, Desktop-Experience, NET-Framework-45-Features, RPC-over-HTTP-proxy, RSAT-ADDS, RSAT-Clustering, RSAT-Clustering-CmdInterface, RSAT-Clustering-Mgmt, RSAT-Clustering-PowerShell, Web-Mgmt-Console, WAS-Process-Model, Web-Asp-Net45, Web-Basic-Auth, Web-Client-Auth, Web-Digest-Auth, Web-Dir-Browsing, Web-Dyn-Compression, Web-Http-Errors, Web-Http-Logging, Web-Http-Redirect, Web-Http-Tracing, Web-ISAPI-Ext, Web-ISAPI-Filter, Web-Lgcy-Mgmt-Console, Web-Metabase, Web-Mgmt-Console, Web-Mgmt-Service, Web-Net-Ext45, Web-Request-Monitor,  Web-Server, Web-Stat-Compression, Web-Static-Content, Web-Windows-Auth, Web-WMI, Windows-Identity-Foundation
if (!(Test-Path -Path C:\install)) { New-Item C:\install -ItemType Directory }
Invoke-WebRequest "https://download.microsoft.com/download/E/2/1/E21644B5-2DF2-47C2-91BD-63C560427900/NDP452-KB2901907-x86-x64-AllOS-ENU.exe" -Outfile C:\install\Dot_Net_Framework.exe
Invoke-WebRequest "https://download.microsoft.com/download/A/3/7/A371A2C7-B787-4AD9-B56D-8319CE7B40CA/VSU4/vcredist_x64.exe" -Outfile C:\install\VC2012.exe
Invoke-WebRequest "https://download.visualstudio.microsoft.com/download/pr/10912036/b519cb85bab02255e6e00e4562942748/vcredist_x64.exe" -Outfile C:\install\VC2013.exe
Invoke-WebRequest "https://download.microsoft.com/download/0/5/f/05fbbfff-8316-4d12-a59d-80b3c56e4d81/ExchangeServer2016-x64-cu17.iso" -Outfile C:\install\Exchange2016CU17.iso
Restart-Computer
Nach dem Neustart des Servers können dann das .NET Framework sowie die UCMARuntime installiert werden.
Mount-DiskImage -ImagePath C:\install\Exchange2016CU17.iso -StorageType ISO
$ExSetupPath = (Get-CimInstance -Namespace root/CIMV2 -ClassName win32_logicaldisk -Filter DriveType=5 | ? VolumeName -IMatch "EXCHANGESERVER").DeviceID
Copy-Item -Path $("{0}\Setup.exe" -f $ExSetupPath) -Destination "C:\install\Exchange2016_Setup" -Recurse
C:\install\VC2012.exe /install /quiet /norestart
C:\install\VC2013.exe /install /quiet /norestart
C:\install\Dot_Net_Framework.exe /q /log %temp%\Dot_Net_Framework.htm /promptresart
Jetzt sollte vorab das Active Directory auf Exchange Server 2016 vorbereiten werden -> KLICK (In kleineren Umgebungen ohne separates AD-Team würde ich wie im verlinkten Artikel einfach den Setup Assistenten von Exchange 2016 die Vorbereitungen erledigen lassen.) Sobald das ISO File mit der Exchange 2016 Installation gemountet ist, kann die Installation in 10 Klicks erfolgen:
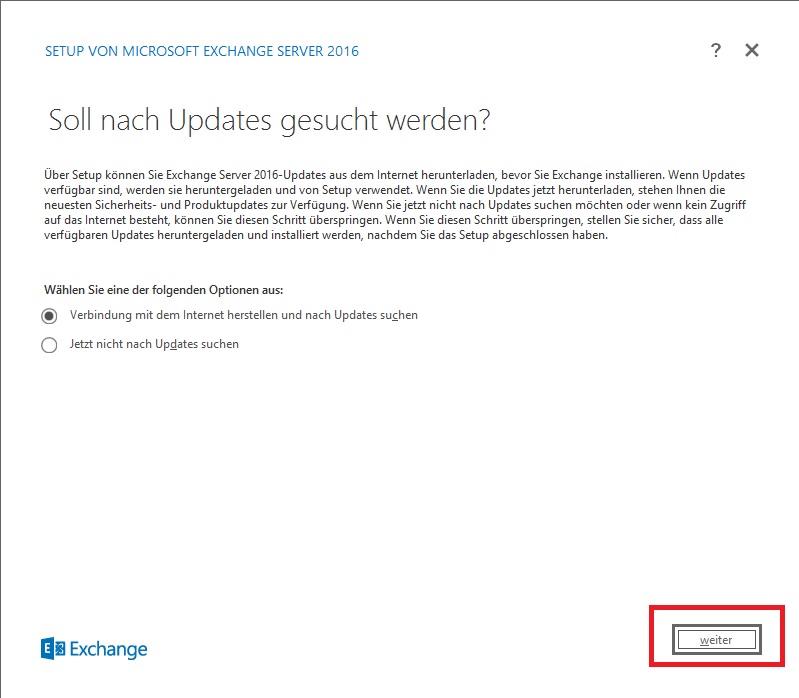
Exchange_2016_01 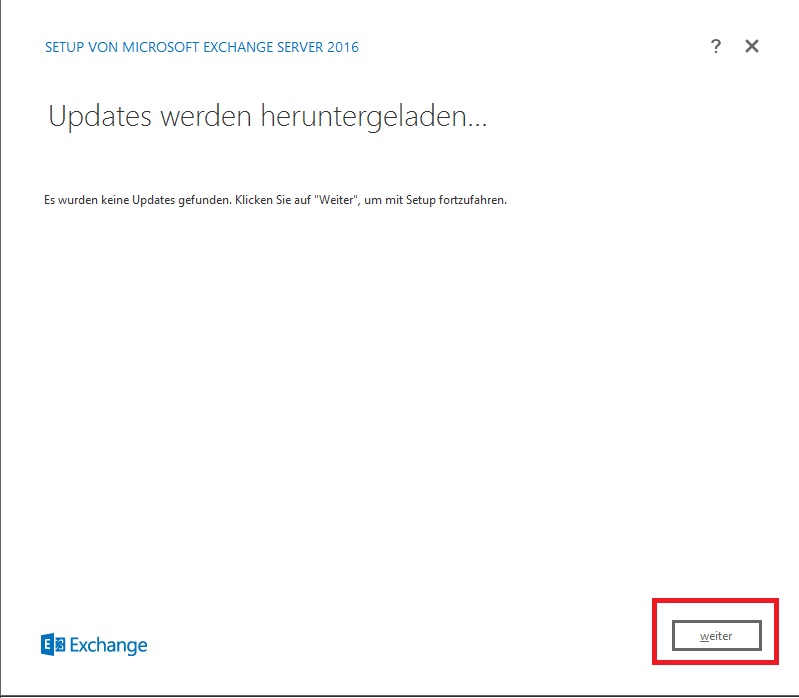
Exchange_2016_02 
Exchange_2016_03 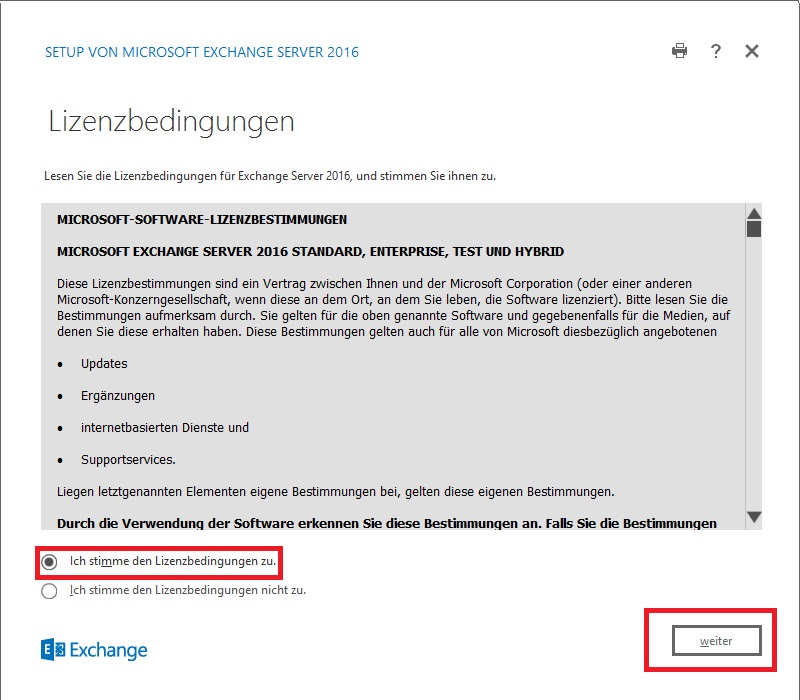
Exchange_2016_04 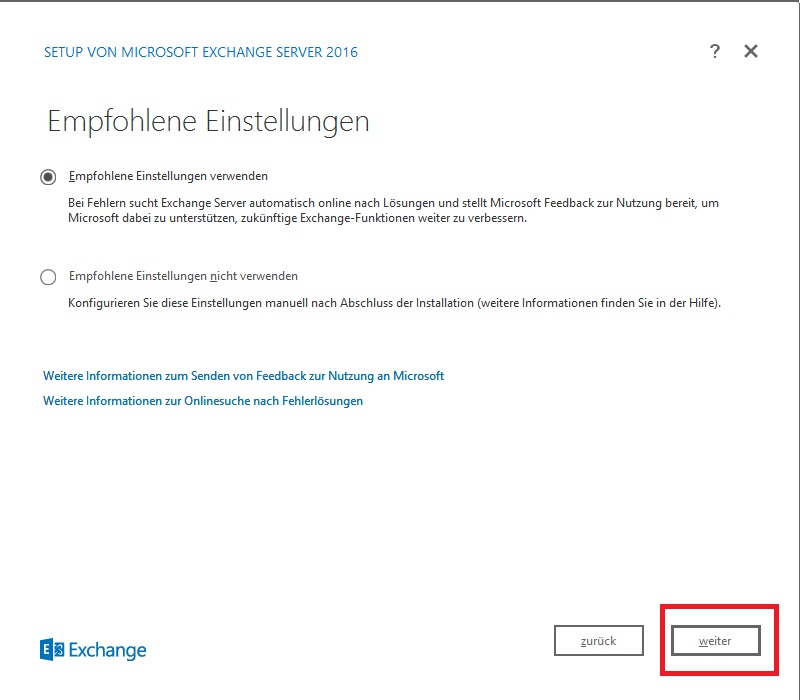
Exchange_2016_05 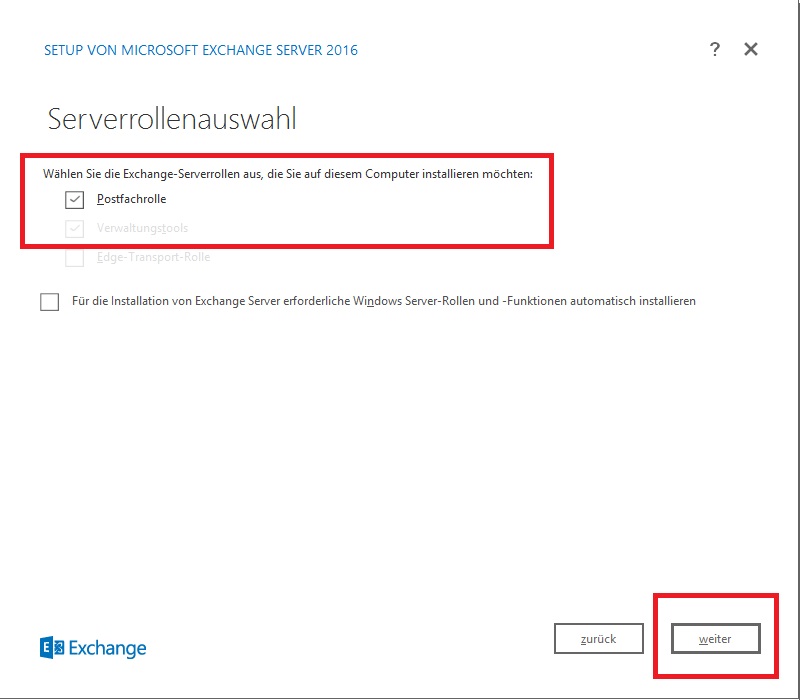
Exchange_2016_06 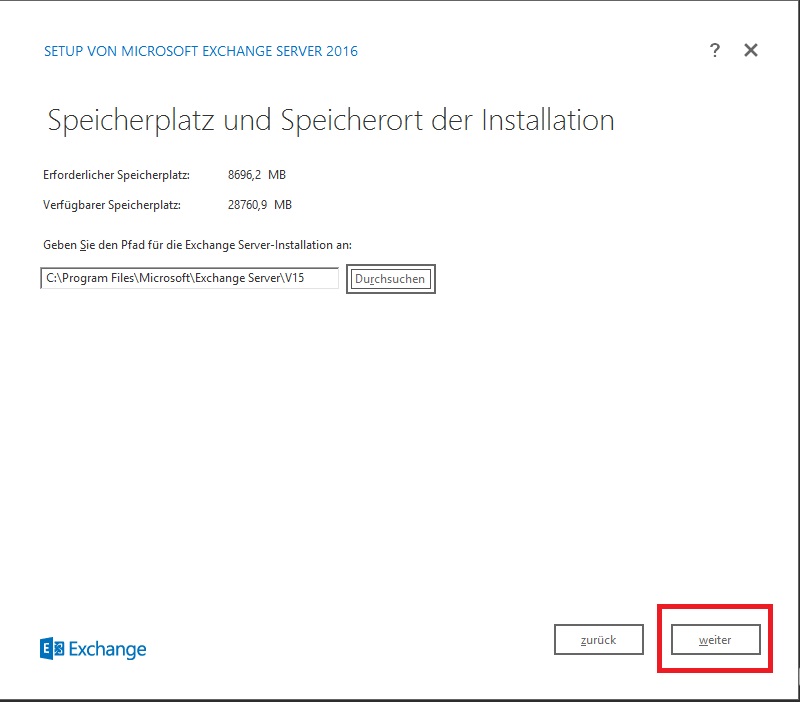
Exchange_2016_07 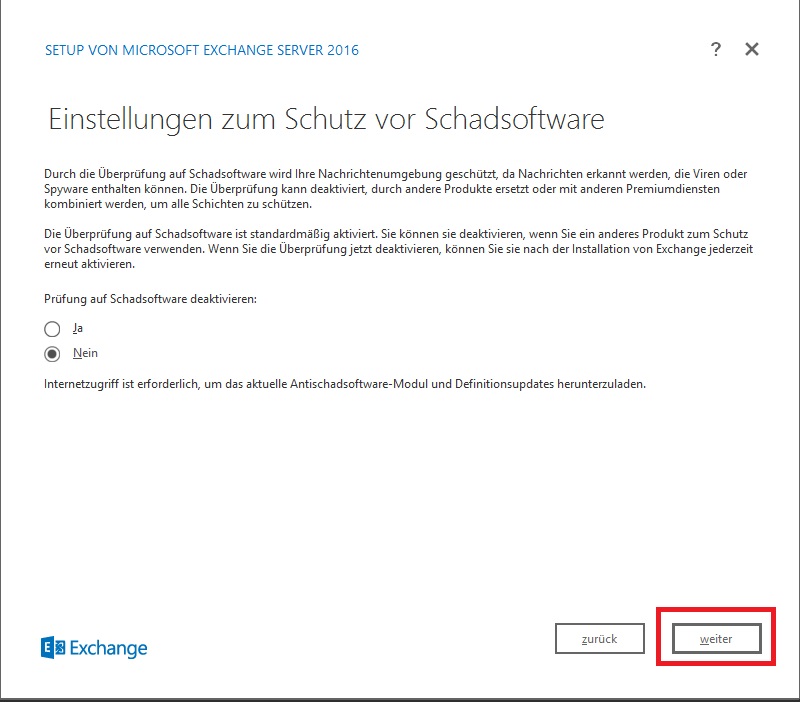
Exchange_2016_08 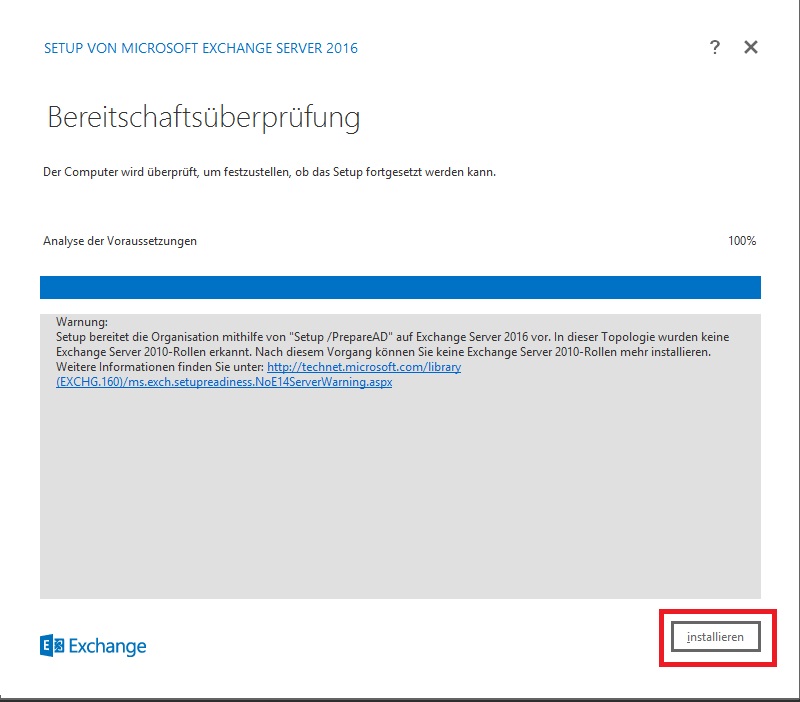
Exchange_2016_09 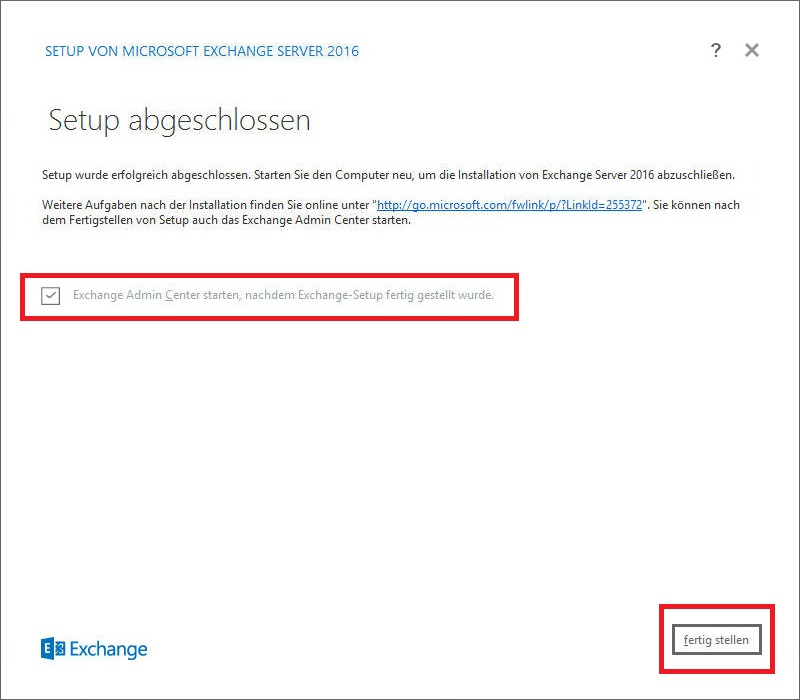
Exchange_2016_10
Alternativ zum Klicken einfach:
C:\install\Exchange2016_Setup\Setup.exe /mode:Install /roles:Mailbox /IAcceptExchangeServerLicenseTerms

# Ggfs. auch direkt mit passendem Speicherort für Datenbanken und Logs:

C:\install\Exchange2016_Setup\Setup.exe /mode:install /roles:Mailbox /MdbName:EXCH2016-DB01 /DbFilePath:D:\Exchange-DBs\EXCH2016-DB01\EXCH2016-DB01.edb /LogFolderPath:E:\Exchange-Logs\EXCH2016-DB01 /IAcceptExchangeServerLicenseTerms /InstallWindowsComponents
Nach der Installation des neuen Exchange-Servers kann mit der Konfiguration sowie der eigentlichen Migration begonnen werden.
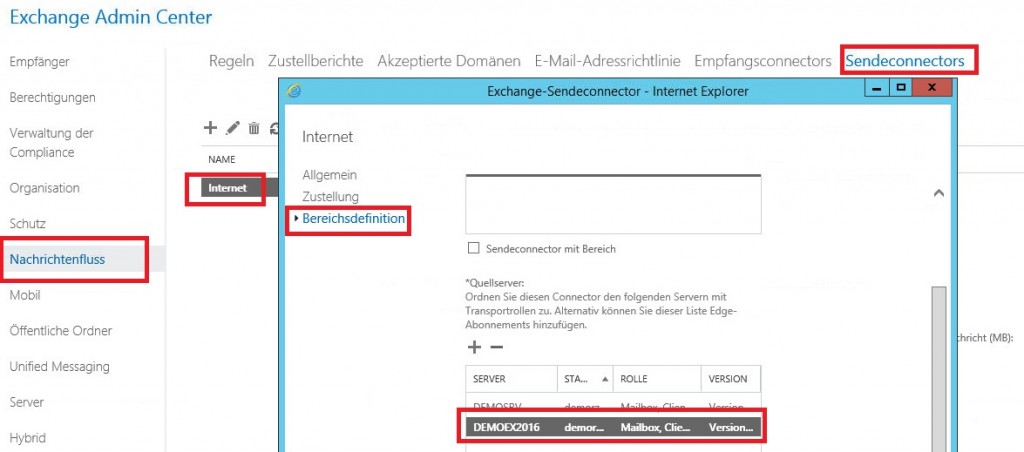
Exchange 2016 Sendeconnector anpassen 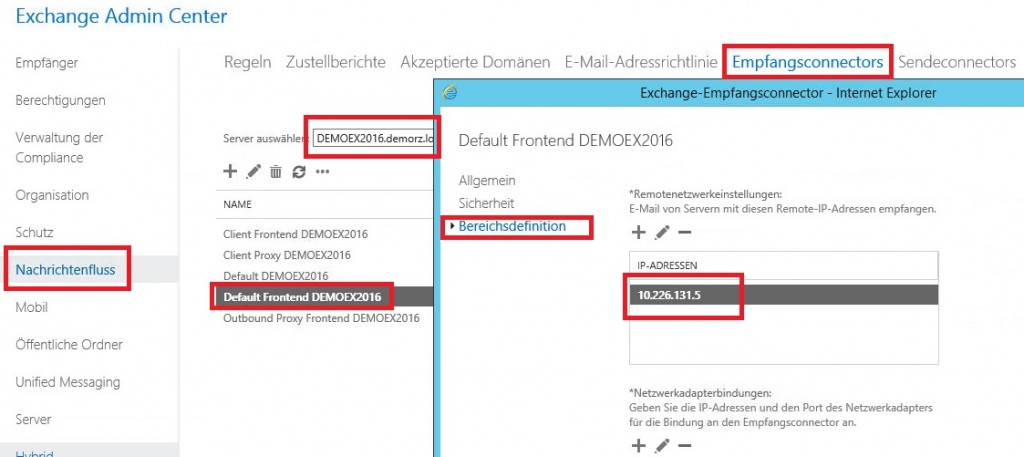
Exchange 2016 Empfangsconnector anpassen 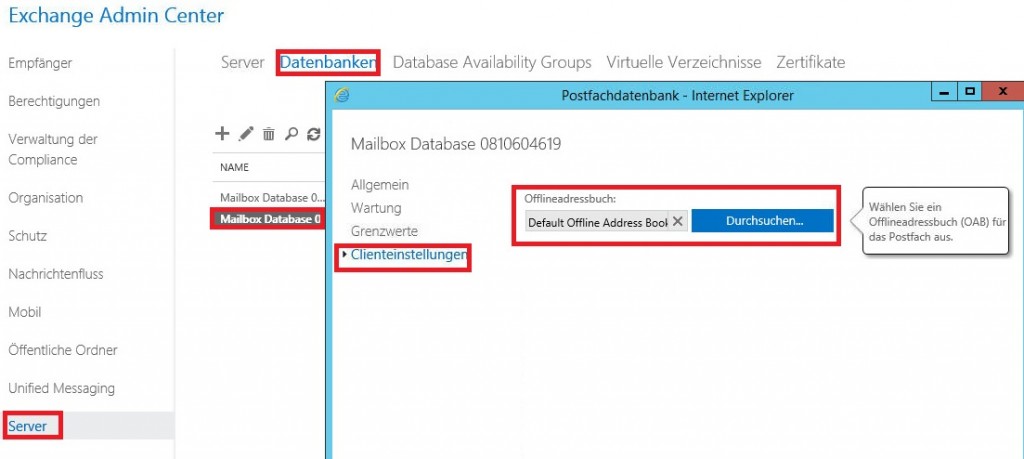
Exchange 2016 Offline Address Book anpassen
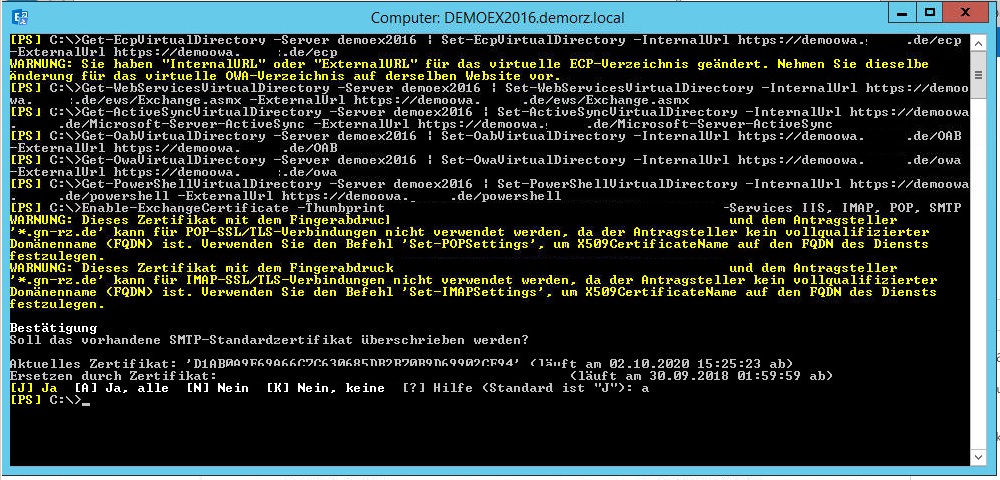
Nachdem das alte Zertifikat vom Exchange 2013 auf dem neuen Exchange Server 2016 importiert wurde (oder ein neu erworbenes Zertifikat eingebunden wurde), ist es an der Zeit in die Shell zu wechseln und die virtuellen Verzeichnisse anzupassen:
Get-OwaVirtualDirectory -Server $env:COMPUTERNAME | Set-OwaVirtualDirectory -InternalUrl "https://owa.<domain.tld>/owa" -ExternalUrl "https://owa.<domain.tld>/owa" -Confirm:$false
Get-EcpVirtualDirectory -Server $env:COMPUTERNAME | Set-EcpVirtualDirectory -InternalUrl "https://owa.<domain.tld>/ecp" -ExternalUrl "https://owa.<domain.tld>/ecp" -Confirm:$false
Get-WebServicesVirtualDirectory -Server $env:COMPUTERNAME | Set-WebServicesVirtualDirectory -InternalUrl "https://owa.<domain.tld>/EWS/Exchange.asmx" -ExternalUrl "https://owa.<domain.tld>/EWS/Exchange.asmx" -Confirm:$false -Force
Get-ActiveSyncVirtualDirectory -Server $env:COMPUTERNAME | Set-ActiveSyncVirtualDirectory -InternalUrl "https://owa.<domain.tld>/Microsoft-Server-ActiveSync" -ExternalUrl "https://owa.<domain.tld>/Microsoft-Server-ActiveSync" -Confirm:$false
Get-OabVirtualDirectory -Server $env:COMPUTERNAME | Set-OabVirtualDirectory -InternalUrl "https://owa.<domain.tld>/oab" -ExternalUrl "https://owa.<domain.tld>/oab" -Confirm:$false
Get-MapiVirtualDirectory -Server $env:COMPUTERNAME | Set-MapiVirtualDirectory -InternalUrl "https://owa.<domain.tld>/mapi" -ExternalUrl "https://owa.<domain.tld>/mapi" -Confirm:$false
Get-OutlookAnywhere -Server $env:COMPUTERNAME | Set-OutlookAnywhere -InternalHostname "owa.<domain.tld>" -ExternalHostname "owa.<domain.tld>" -ExternalClientsRequireSsl:$true -InternalClientsRequireSsl:$true -ExternalClientAuthenticationMethod 'Negotiate' -Confirm:$false
Get-ClientAccessService -Identity $env:COMPUTERNAME | Set-ClientAccessService -AutoDiscoverServiceInternalUri https://autodiscover.<domain.tld>/autodiscover/autodiscover.xml -Confirm:$false

Enable-ExchangeCertificate -Thumbprint <Thumbprint> -Services IIS, IMAP, POP, SMTP
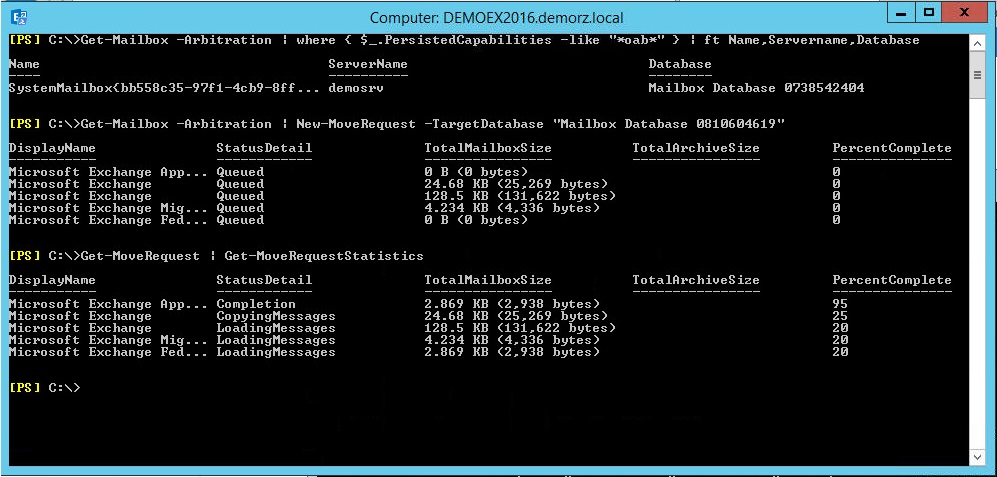
Verschieben der Offline Address Book Generierung / Arbitration Mailboxen:
Get-Mailbox -Arbitration | New-MoveRequest -TargetDatabase <Neue Exchange 2016 DB>
Get-Mailbox -AuditLog | New-MoveRequest -TargetDatabase <Neue Exchange 2016 DB>
Get-MoveRequest | Get-MoveRequestStatistics
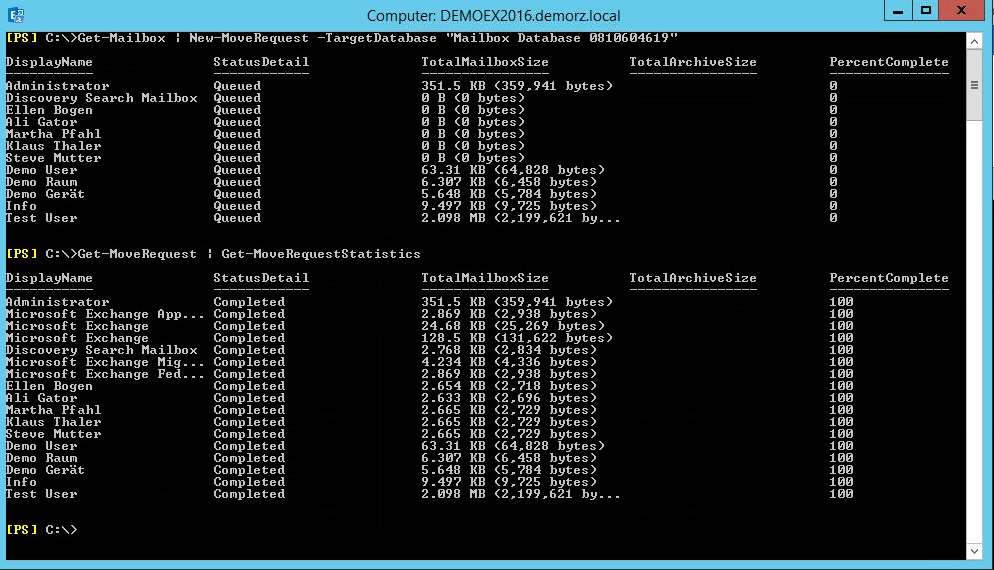
Verschieben der restlichen Postfächer:
Get-Mailbox | New-MoveRequest -TargetDatabase <Neue Exchange 2016 DB>
Get-MoveRequest | Get-MoveRequestStatistics
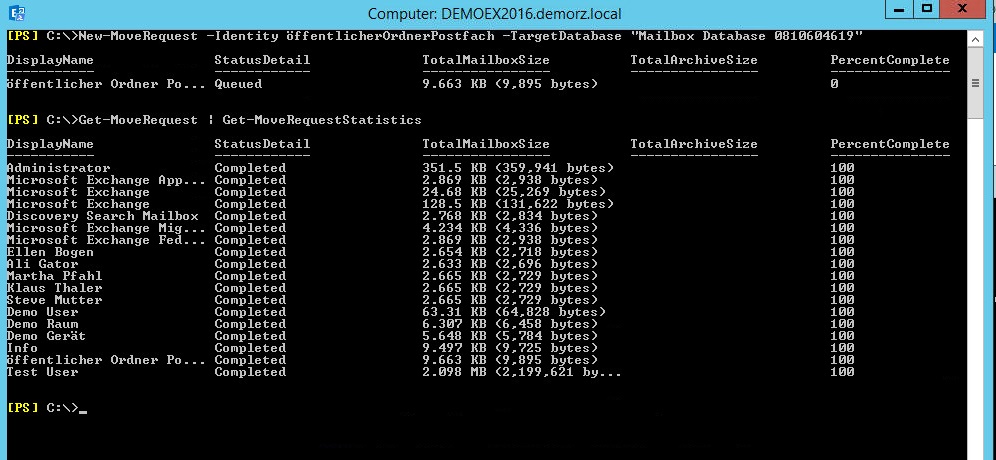
Verschieben der öffentlichen Ordner auf den neuen Exchange 2016 (sofern vorhanden):
Get-Mailbox -Publicfolder | New-MoveRequest -TargetDatabase <Exchange 2016 DB>
Get-MoveRequest | Get-MoveRequestStatistics
Nachdem die Migration durch ist und die Postfächer verschoben sind, können die Verschiebeanforderungen gelöscht werden:
Get-MoveRequest | Remove-MoveRequest
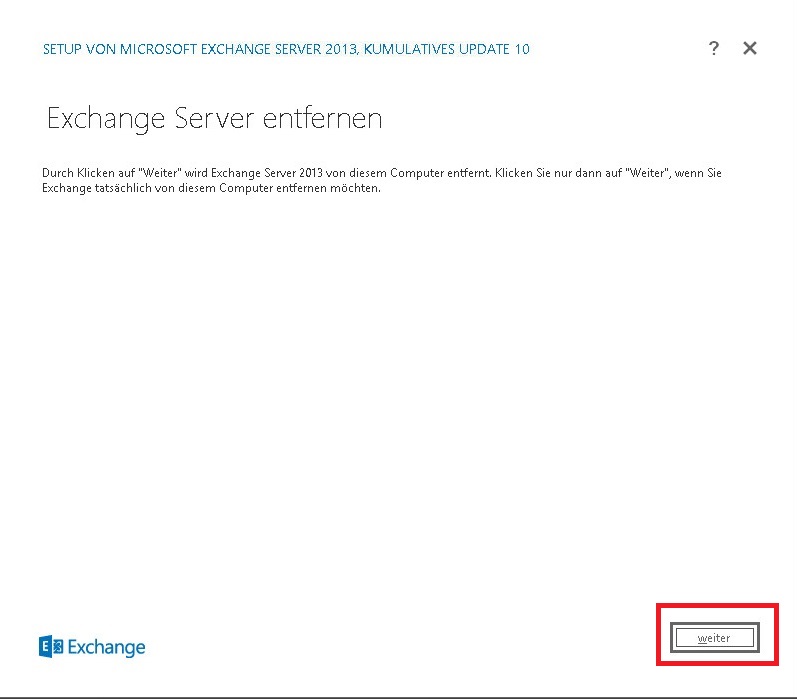
Jetzt kann mit der Deinstallation des Exchange 2013 begonnen werden. Mit 3 Klicks und einen Reboot ist die Deinstallation erledigt:
Exchange 2013 entfernen 01 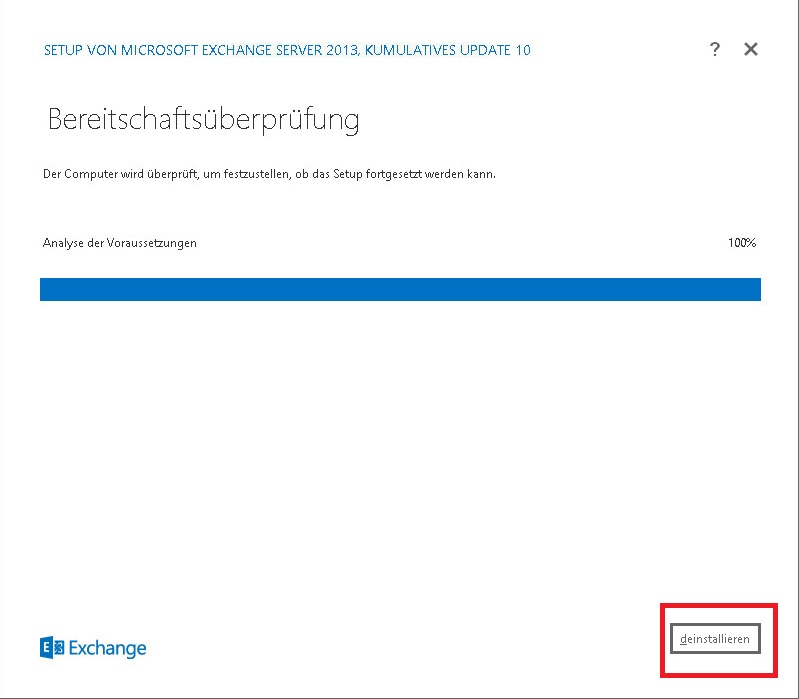
Exchange 2013 entfernen 02 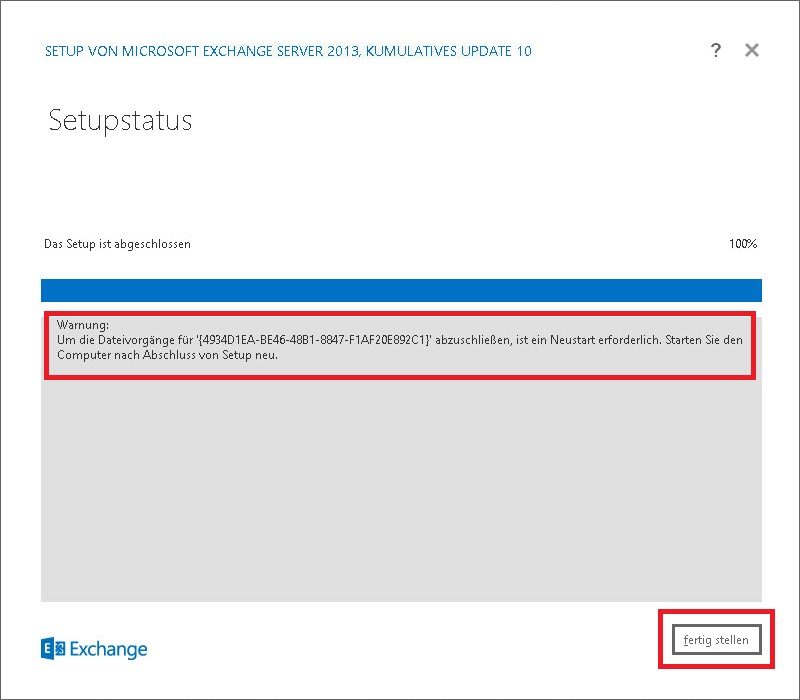
Exchange 2013 entfernen 03

Schreibe einen Kommentar